Astrophotography with the Nexstar 8SE
Earlier this summer, Comet Neowise passed by, giving me a glimpse of the second comet I’ve seen in my lifetime. The previous sighting was the amazing Hale-Bopp in the 90s. Although I am old enough for Halley’s 1986 visit, I couldn’t see it at all from my location in the northern hemisphere. Comet Neowise was visible to the naked eye once dark-adapted, and its tail spanned a large swathe of sky. My one regret is not having a decent telescope for its viewing.
If there’s one thing about the house-arrest experience of 2020’s pandemic, it’s that it encourages you to take up new hobbies. Astronomy was always one of my hobbies, but, like many, it had been back-burned as I got older. Newly-motivated, I purchased a Nexstar 8SE. Since one of my other hobbies is photography, it seemed inevitable that I would delve into astrophotography.

So, I think my biggest misconception about astrophotography was that all of those amazing internet photos were taken with giant telescopes. Bigger must be better for astrophotography, right? Well, I think I was surprised to learn that most photos I viewed were taken with relatively small (80 mm - 100 mm aperture) telescopes. The Nexstar 8SE has an 8” (203 mm) aperture. Many of these smaller scopes had modest focal lengths in the 250 mm - 450 mm range, compared to the Nextstar 8SE’s 2032 mm. So what gives?
I wrote a separate blog post about what to consider when buying a telescope. The things to keep in mind are:
Focal length directly affects magnification. Divide your eyepiece into your focal length for magnification. So, a 400 mm telescope with a 10 mm eyepiece magnifies 40 times.
Aperture directly affects brightness and detail. The dimmest object you can see is determined by aperture.
Focal Ratio (f/stop) directly affects how long of an exposure you will need to take to photograph a given object. Divide aperture into focal length to get focal ratio. Camera owners are very familiar with f/stops and know that “fast’ lenses will let a lot of light in, allowing shorter exposure times..
So the desired combination of these elements depends upon your stargazing targets. For example, most people don’t realize how big the Andromeda Galaxy is in the sky because you generally can’t see it with your naked eye. Imagine a full moon, then copy and paste that moon six times wide and three times tall. The Andromeda Galaxy is a little bit bigger than that in our sky! So, if you want to photograph it, and your telescope has so much magnification that it can’t even fit the entire full moon into a single frame, it has zero chance of capturing the Andromeda Galaxy. The Nexstar 8SE cannot fit an entire full moon in frame. I took this daytime photo of the moon by stitching together six photos:

So, if you want to photograph Andromeda-Galaxy-sized things, a smaller focal length telescope, like one of those 200 mm scopes I mentioned earlier, will work better than the Nexstar’s 2032 mm focal length.

Stellarium is excellent free software for planning your astrophotography session. You can see croppings showing exactly what your camera, telescope, and accessories like focal reducers or barlowes will yield. This box shows what to expect from the Nexstar 8SE with a f/6.3 focal reducer and standard DSLR. Even with a focal reducer, you can’t get the entire galaxy in frame. You’ll need a different telescope to accomplish that.
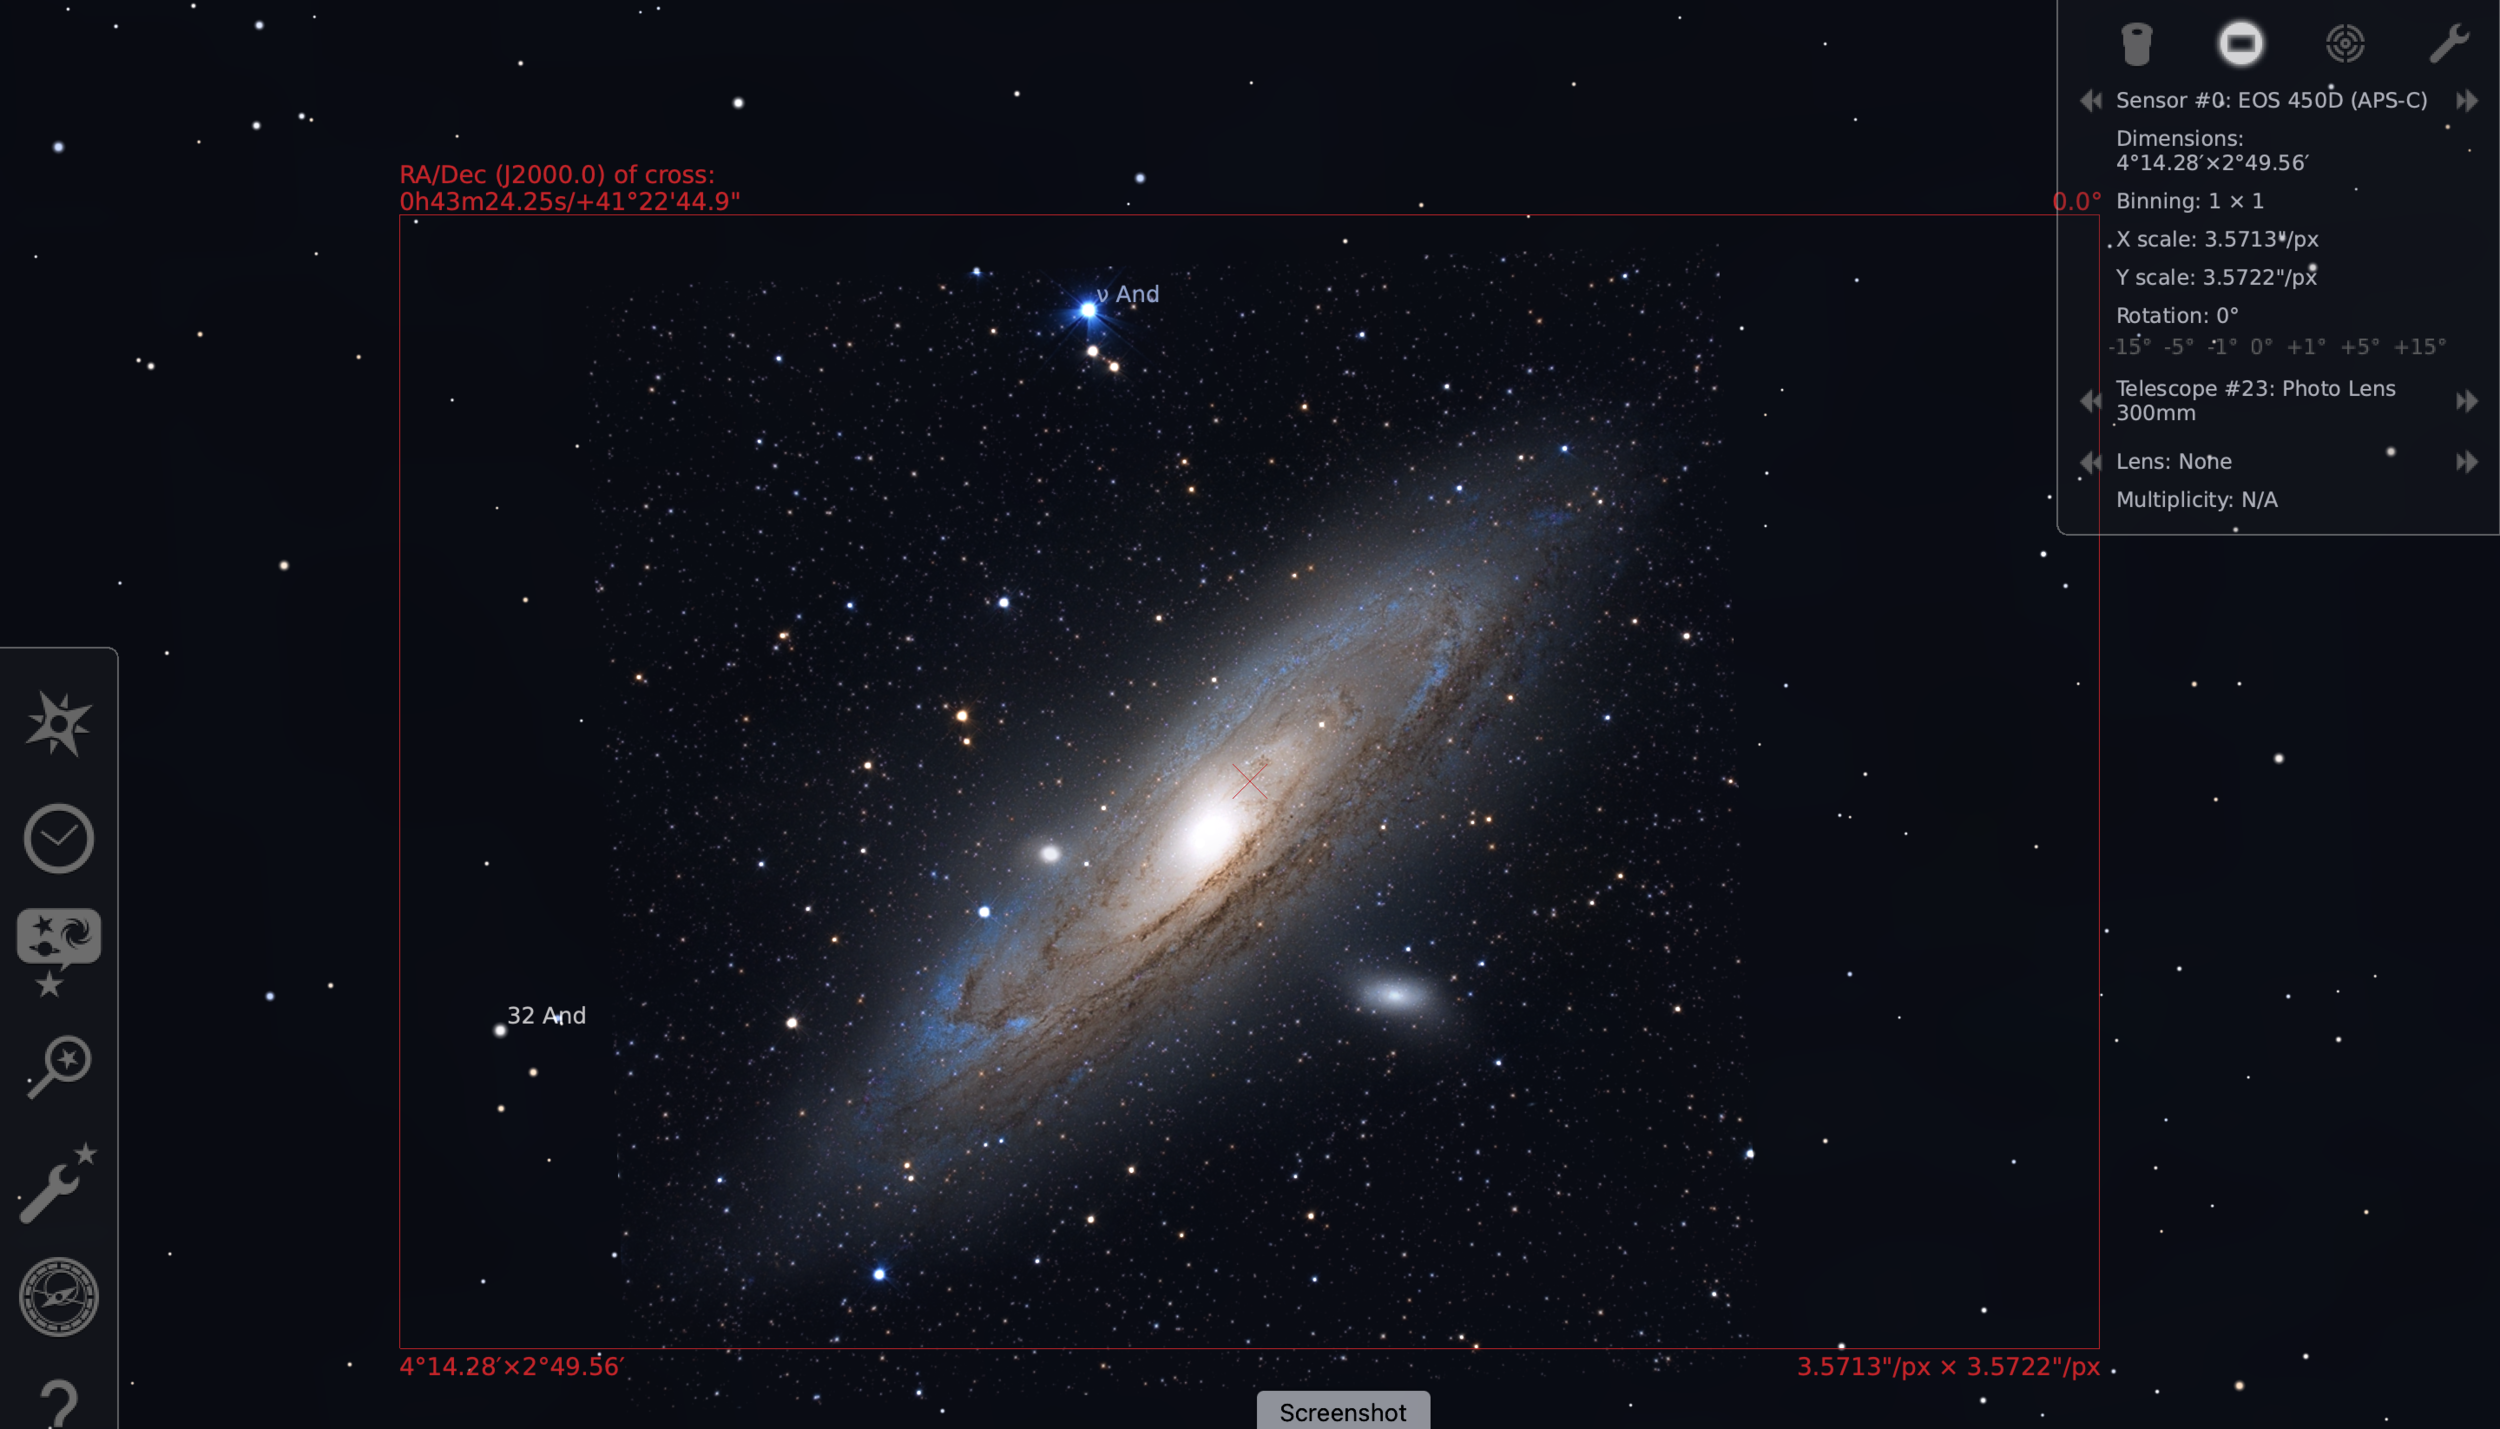
A lens or telescope with a 300 mm focal length should be perfect for getting the entire galaxy in frame.

If you want to get the Orion Nebula, Horsehead Nebula, and Flame Nebula all into one frame, a DSLR with a 200 mm lens is a good choice

That’s exactly what I did in this picture, using a piggyback mount with my Canon T5i DSLR with a 200 mm lens. 272 fifteen-second exposures. Not bad for an alt-az mount! Note this picture is cropped slightly compared to the Stellarium framing because you will loose the edges of your photos due to field rotation.

M45 Pleides, taken with a DSLR piggyback mounted to my 8SE, through the DSLR’s 200 mm lens. This let me use the Goto mount’s tracking to keep the image centered. 75 ten-second exposures, stacked.

Another piggyback mount photo - 300 mm lens with 396 10-second exposures of the Andromeda Galaxy.

50mm f/1.8 lens, piggyback mount, Cassiopeia region with the Heart Nebula visible in the upper right. 120 8-second exposures.

Nexstar 8SE with a piggyback mount (center, right). Ideally, I’d have a separate EQ mount for my DSLR, such as a Skywatcher Star Adventurer, but for $20 the piggyback bracket was a cheap way to try out wide-field astrophotography without purchasing a second rig. The smaller of the two lenses is the Starsense camera, which auto-aligns the telescope using plate solving. I should note that the 8SE’s alt-az mount is rated for 11 lbs, and the 8SE OTA weighs 11 pounds, so piggybacking anything puts you over the mount’s payload...but, it is the same DSLR I already attach to the mount’s visual back for photos.
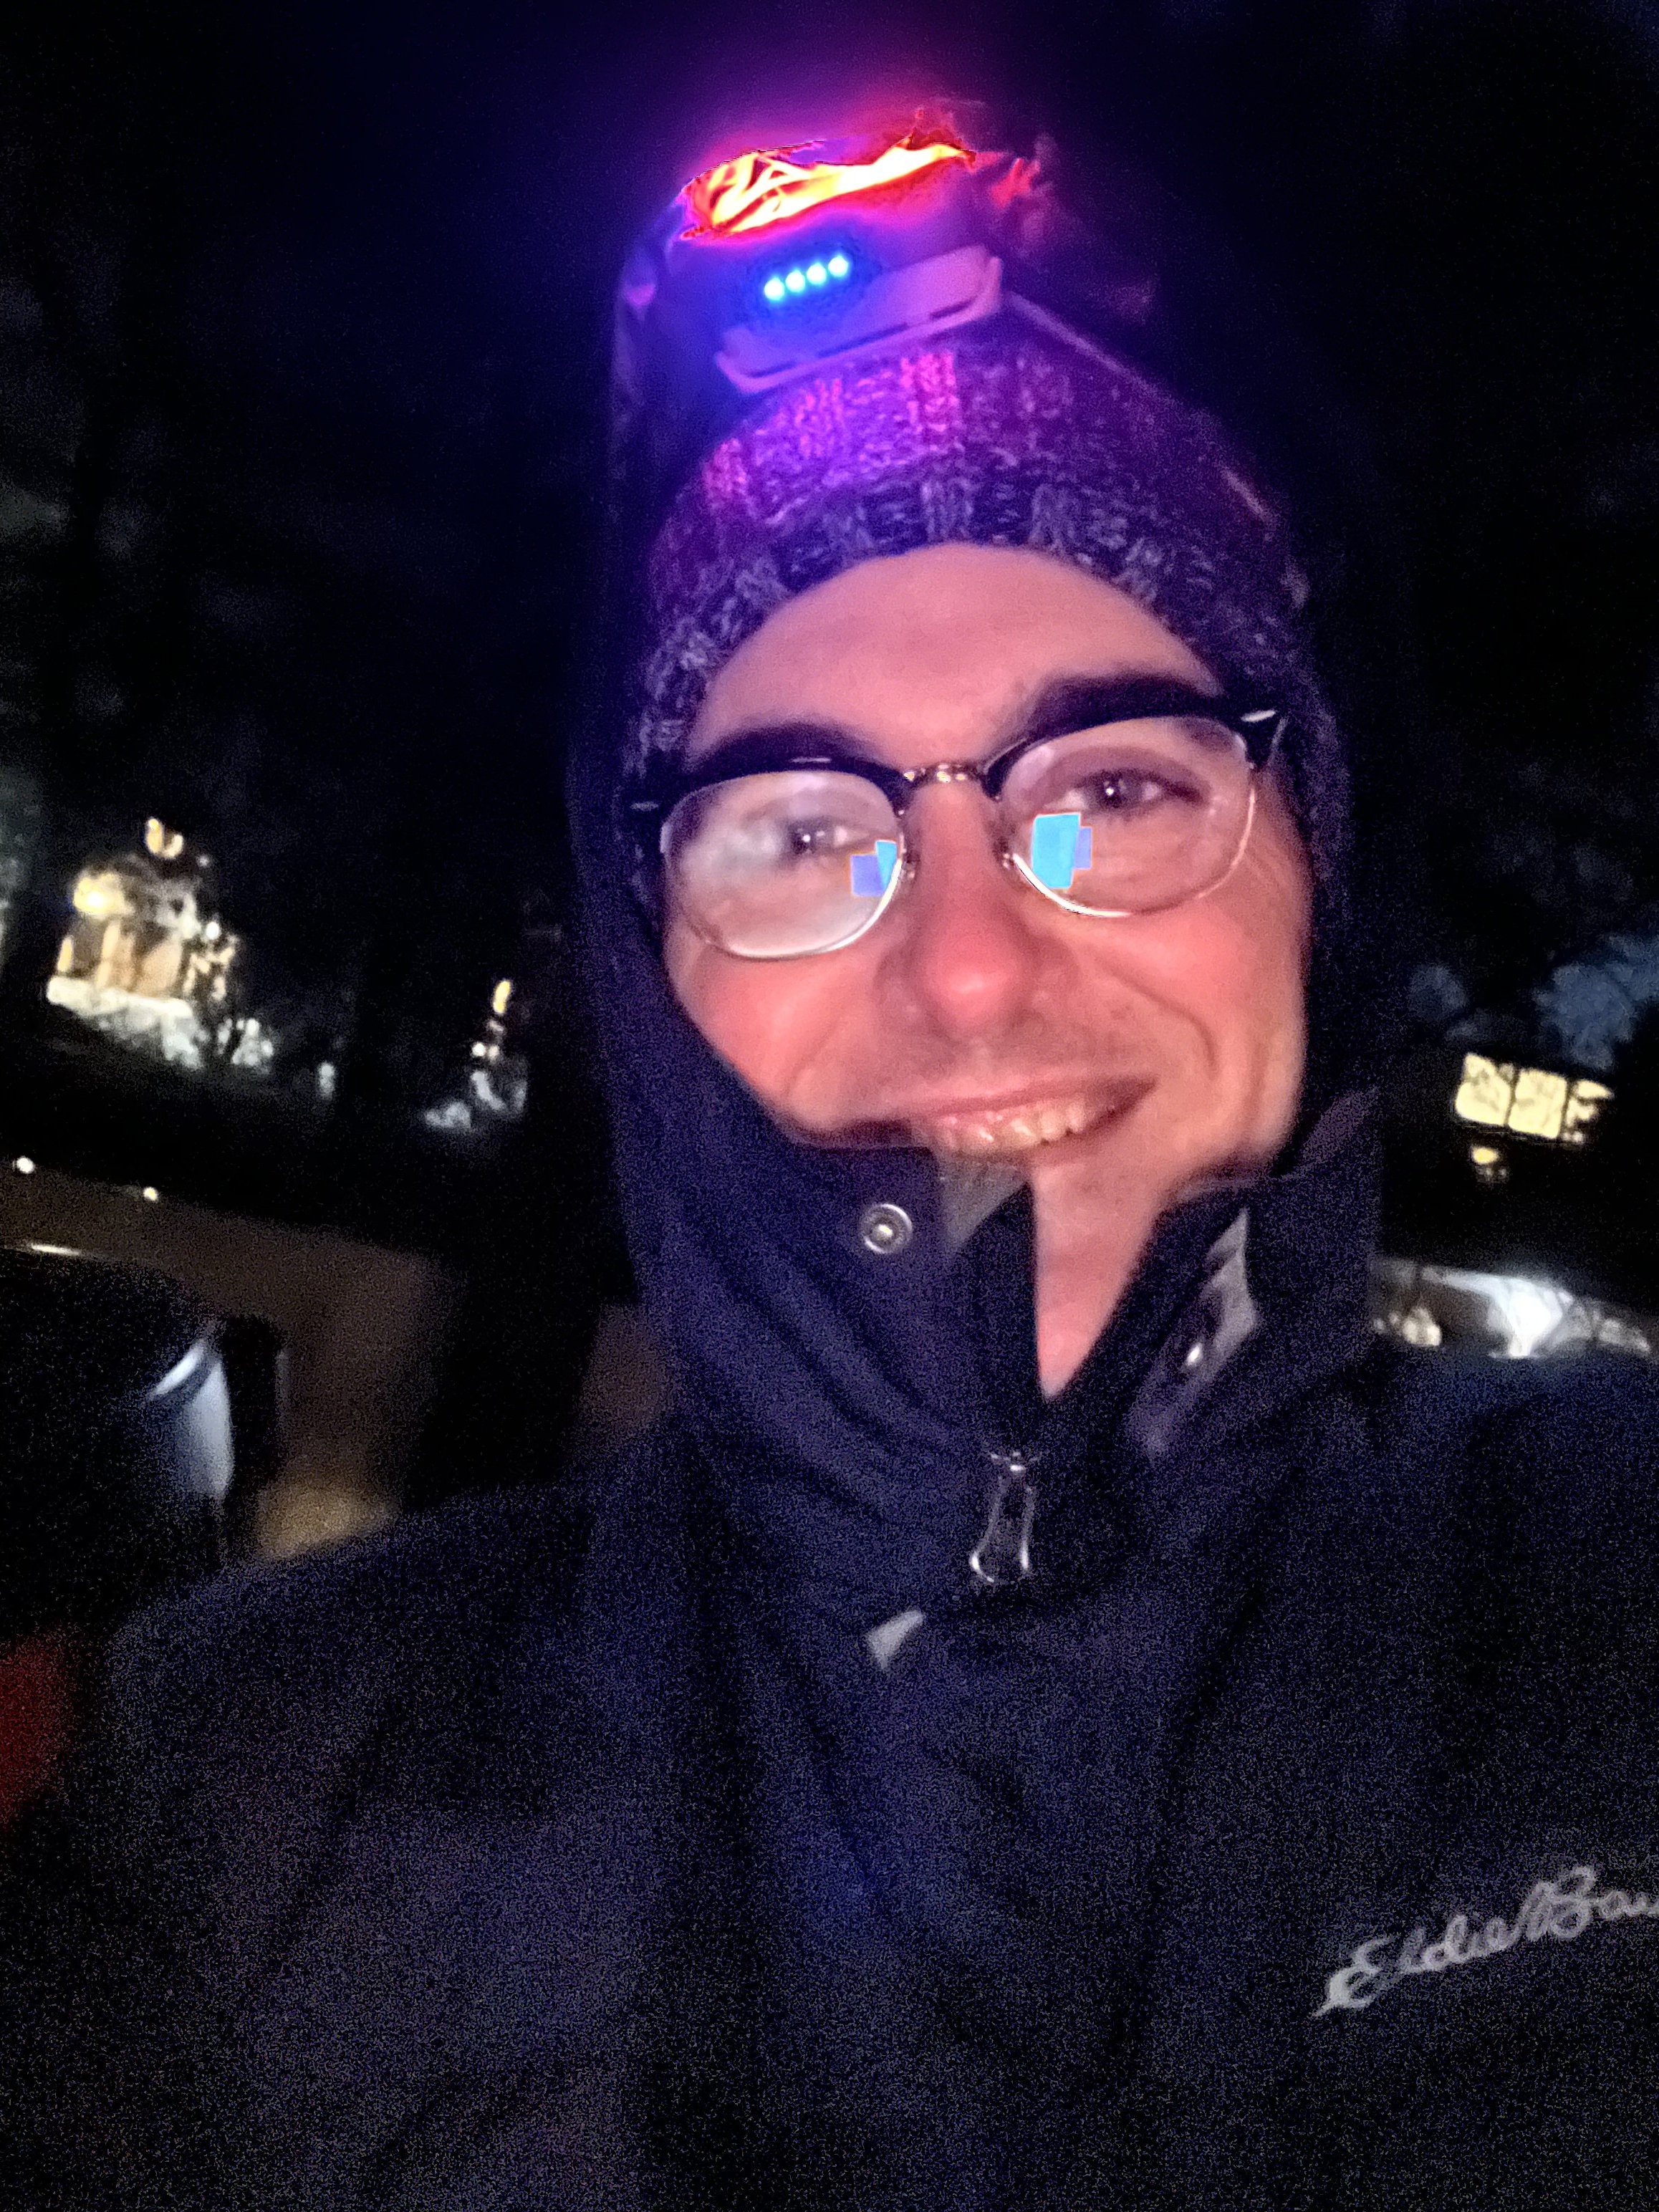
Also highly recommended gear: Warm jacket, red head lamp, and rechargeable hand warmers. It was 9 degrees Fahrenheit when I snapped this photo, and the one above it.
Now the next part is a little tricky. As much as you may try, your eyes cannot take long-exposure images. So if you want to see dim things, you’ll want a larger aperture telescope. But if you want to photograph dim things, you want a telescope with a fast focal ratio, since focal ratio affects exposure time.
Those small scopes make a little more sense now. They all have very fast lens with medium focal lengths and are built for astrophotography. Could you use them for visual astronomy? You could, but for eyeballs the big guys like the Nexstar 8SE will do a much better job.
The other thing the small scopes have in common is a tracking equatorial mount. The Nexstar 8SE has a tracking altitude-azimuth mount. In theory, if you wanted a one hour time-lapse camera exposure, both telescopes should be able to keep everything motionless and centered due to their tracking capability, right? Well, no, not for an alt-az mount, and this is the part that confused me at first.
To understand why, let’s do a quick exercise. Make a fist and stick your arm straight out. I’ll wait…okay, I see you’re not doing it, c’mon…that’s better. Now, rotate your arm so that your fist turns clockwise. We’re going to call the axis that your arm is rotating the z-axis. Now lift your arm up as if pointing to the moon and bring it back down. The up-and-down motion of your arm is the y-axis, or altitude axis. Now swing your arm to the left and right. The left-right motion is the x-axis, or azimuth axis. An altitude-azimuth mount can move in the left-right and up-down directions, but can’t rotate in the z-axis.
An equatorial mount rotates in the z-axis, or right ascension axis. Stick your fist back out. Now, imagine an arrow coming up off the top of your hand. Move your hand up six inches in the direction of the arrow and bring it back down. By doing this you’ve added a second axis. The up-down motion is the declination axis.
Now, rotate your wrist 90-degrees clockwise. The imaginary arrow coming off the top of your hand rotates with it and is now pointing to the right. Swing your arm in the direction of the arrow. This is still the declination axis. It’s always in the direction the top of your hand is pointing, regardless of how you rotate it.
I found right ascension, declination, altitude and azimuth thoroughly confusing, but the arm exercise helped me understand it. So, why on earth would you want to use the complicated equatorial mount? The answer is because you are on Earth, and Earth has this inconvenient feature of constantly rotating. Because of the Earth’s rotation, stars travel in arcs across the sky. Like an archer’s arrow, they rise, peak, then fall below the horizon. If you remember your geometry days, trying to draw a circle using (x, y) coordinates is complicated. But drawing it in polar coordinates is mindlessly easy. Alt-az is x,y and equatorial is polar.
It’s not just that it’s harder. Imagine your archery friend wants you to take a video of him shooting an arrow. You zoom in on the arrow as it shoots 45 degrees up into the sky and you perfectly track it as it reaches its apex, tilts down, and descends, sticking in the ground. When you play back the video, the arrow is perfectly centered in frame, but it rotates, initially pointing up, flattening, then pointing down. That’s because you are tracking it in the x-y (alt-az) axis. You’d need to add a third axis, rotation of your wrist, to compensate for the rotation of the arrow.
Get it? The Nexstar 8SE will perfectly track Saturn across the sky, keeping it centered in frame, but, like the arrow, Saturn’s rings will start pointing up at 45 degrees, flatten, and then point down over time. The only way to fix that is to add a z-rotational axis to your telescope. If I were to do a long-exposure of Saturn, the disc of Saturn would stay centered but, like a snow-angel’s wings, Saturn’s rings would fan out into blurry arcs and its moons would trace star trails.
One of the best explanations of right ascension/declination and alt-alz coordinate systems and mounts can be found in this YouTube video by Astrophotography P2
The answer to “how long of an exposure can you take with the Nexstar 8SE before getting star trails” is complicated, but in general, probably about 30 seconds. Things close to the North Star trace smaller arc than things further away, so the amount of blurring you get depends on where the object is in the sky. I usually limit exposures to 15 seconds.
The other issue is that the tracking control software drifts over time and makes a correction every 30 seconds or so. In the 360-photo sequence of the Orion Nebula, below, you can see the nebula drift up and then back down. If I tried to do 60-second exposures, it would have been a blur. But as 5 second exposures it was fine. The photo stacking software re-aligned all the images in post-processing:


Frame captured during the mount’s error correction slewing.
This is a good segue into the next misconception I had for astrophotography: what you see in the telescope doesn’t remotely look like the Hubble-telescope-type photos posted on the internet. First, your eye can’t take 15 second exposures, so even bright objects like the Hercules Cluster look like milky, faint cotton balls and colorful objects like the Orion Nebula look like milky, faint wedges. Second, 15 seconds isn’t enough even for a camera. To get those amazing photos, you need to stack hundreds of images. Imagine you’re using an old film camera and a 15 second exposure would blur due to movement. Instead, you do 15 one-second exposures, all on the same piece of film. The end result is 15 seconds of exposure without the blurring. This is key: even though I am limited to short timeframes for my exposures, there’s no limit to the number of exposures I can take, other than my time. So, if I want a one-hour exposure of a faint galaxy, I can take 360 ten-second exposures.*
*Sort of: Dylan O’Donnell tested one 300-second exposure versus thirty stacked 10-second exposures. The 300-second exposure won. You need a minimum signal (observable image separate from background noise) to stack, so low exposure times may not have enough detail, even when stacked.
Now that I’ve got you grounded, here’s the equipment and software:
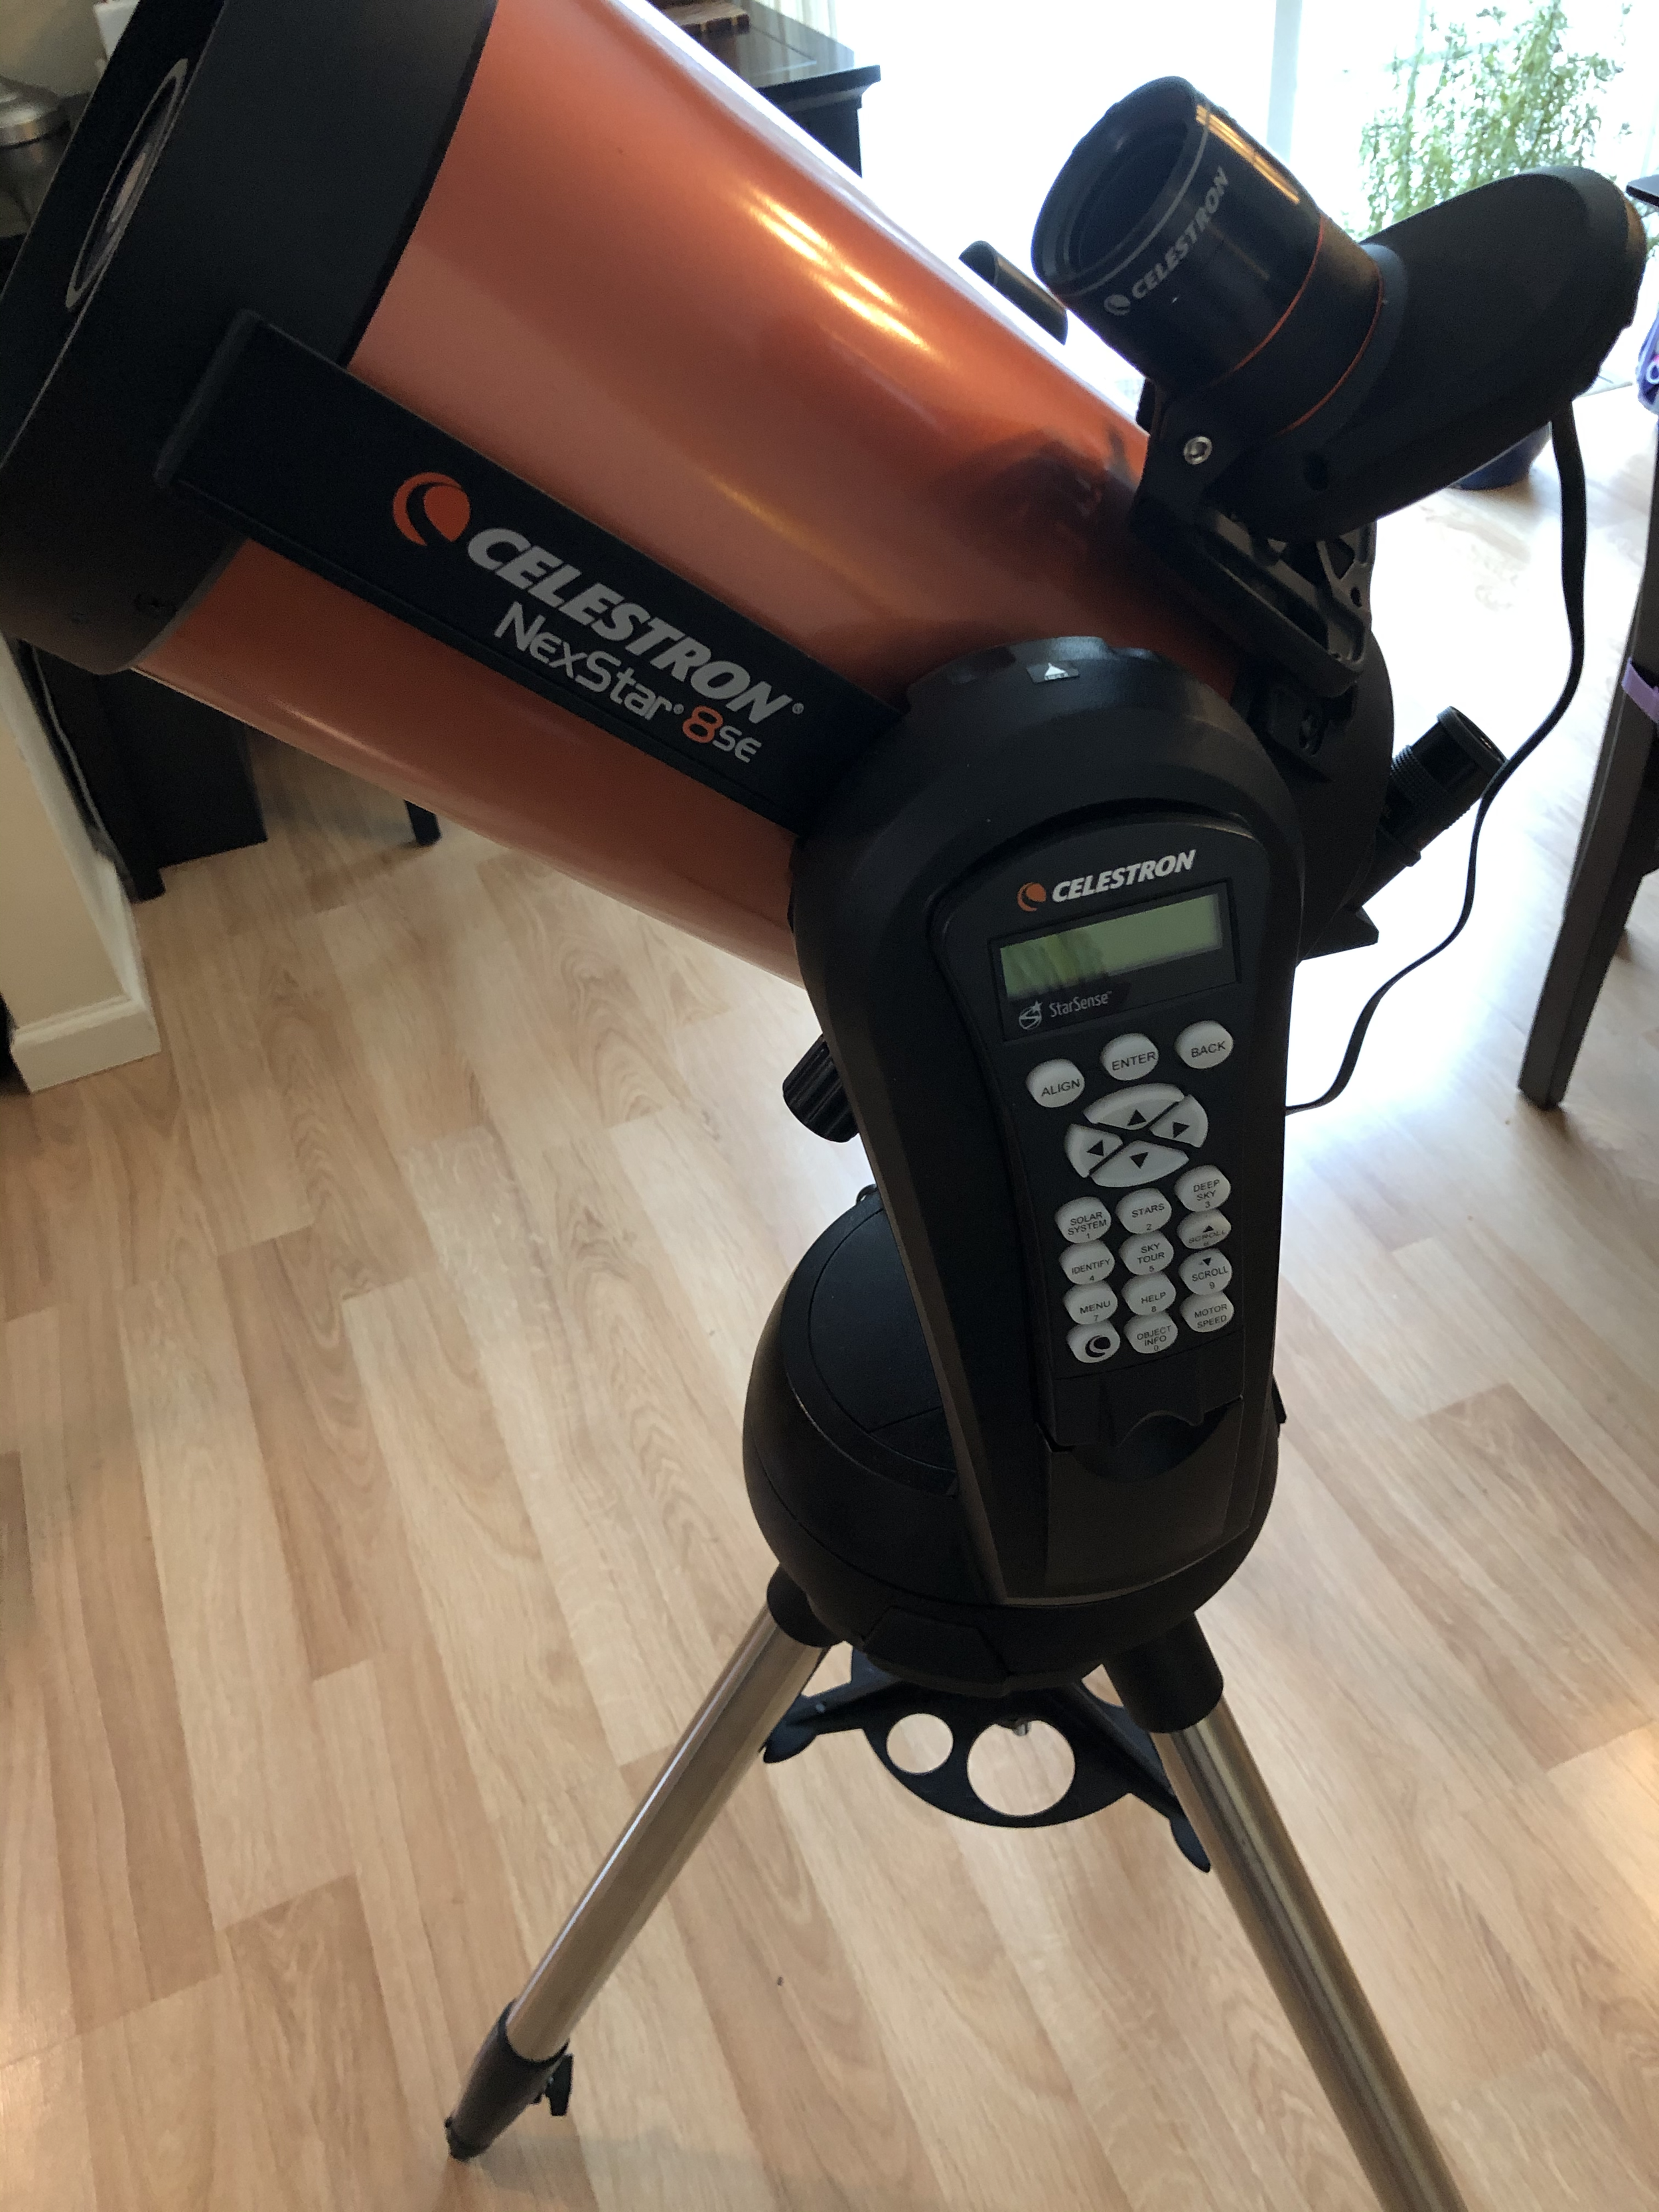
The Nexstar 8SE, upgraded with the StarSense camera. The 8SE has a 3-star alignment process by default, which requires you to center stars it picks in the finder scope. The StarSense camera automates this fully using plate-solving to identify all of the visible stars and figure out where the telescope is. During sub-freezing January nights, you will appreciate turning it on, going inside and getting a cup of tea, and coming back out to have the telescope all setup and ready to go.

Left to right: 1) Bahtinov mask - placed over the telescope’s end, it produces a spiked diffraction pattern around a star that you can use to perfectly focus the telescope. You remove the mask afterwards. 2) Intervalometer - a programmable timer for your camera. You can set it up to take hundreds of exposures at a specified interval and duration. It plugs into the cable release on your camera. 3) Camera T-adapter - screws onto your camera like a lens. The narrow end is 1.25” and fits in your telescope like an eyepiece. Essentially, it changes your telescope into a giant camera lens. Note, instead of mounting your camera through he eyepiece, you can also buy an adapter that mounts directly to the visual back. Keep in mind that the number of things between your camera and the telescope will affect its focal point, and some combinations may exceed the back focus of your scope (it will be impossible to focus without adding things like extenders) 4) Anti-vibration pad - shock absorber placed under the legs of your mount. You’d be surprised how much your telescope picks up deck vibrations.
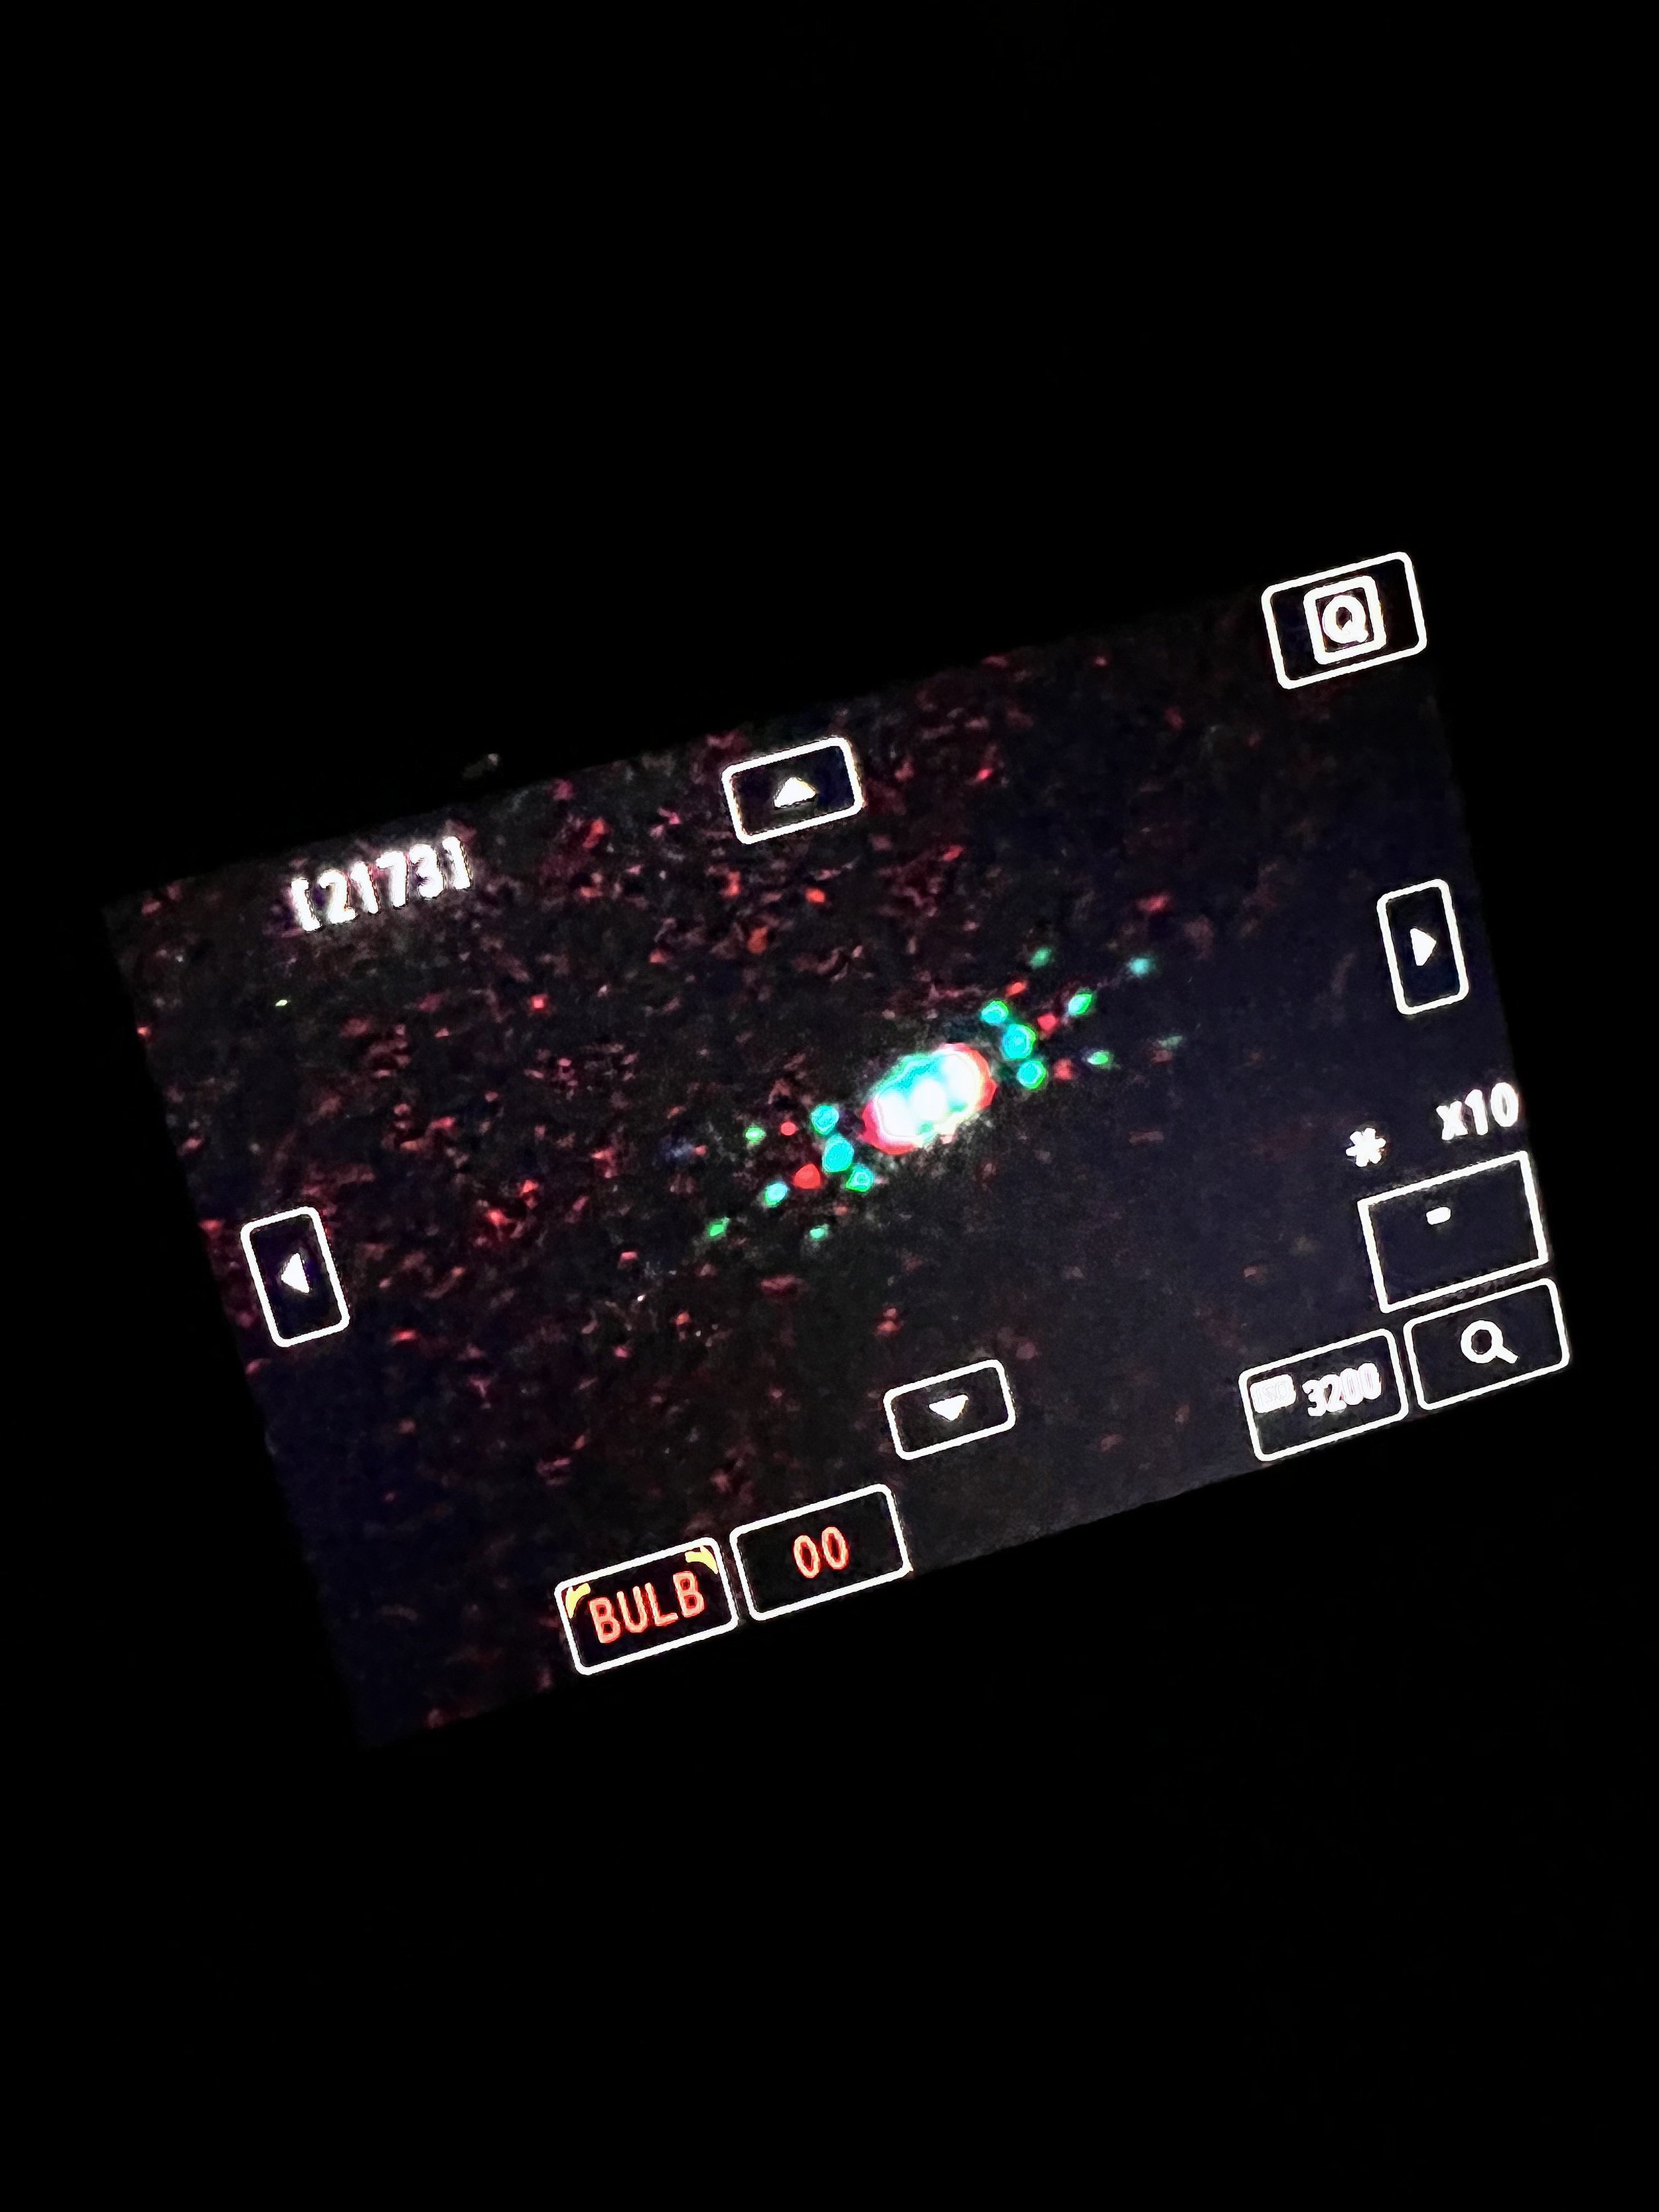
Diffraction pattern produced by a Bahtinov mask when a star is in focus. Tiny adjustments to the focus will rotate the center diffraction arc towards the top or bottom arcs. The goal is to have it centered between them. This is done in realtime using your camera’s live view. On my Canon T5i, I turn on the video display and then 10x zoom to isolate the star and see the diffraction pattern.

Stellarium+ iPhone app - point your phone at the sky and it will tell you what you’re looking at. I use it mainly for planning (and you do need to have a plan based on what’s visible tonight)

Clear Outside iPhone app: Clear nights are fairly rare. This lets you see the week ahead and the hour-by-hour cloud cover along with moon light pollution. It lets me work out my targets ahead of time and not be scrambling at the last minute poking my head outside to see if nature is cooperating. Don’t have the app? Just go to their webpage, clearoutside.com.

Astro Pixel Processor: Stacking software for astrophotography. APP is able to do all sorts of advanced things like stacking hundreds of images, removing light pollution, and assembling composite images taken at different times and angles. If you have a Mac, like me, it works in Mac.

Backyard EOS (Windows) and AstroDSLR (Mac) each connect to your DLSR via USB, controlling it in much the same way that you’d control a dedicated astronomy camera. You can program complex sequences, hit start, and head inside while it does the work. You can use this as an alternative to an intervalometer.. Both can do plate solving and communicate with your mount to correct for errors - which means you can have perfectly centered photos with the click of a button.
You certainly don’t need plate solving to take astrophotos, but if you have a way to control both your camera and mount via laptop, it makes things easier.
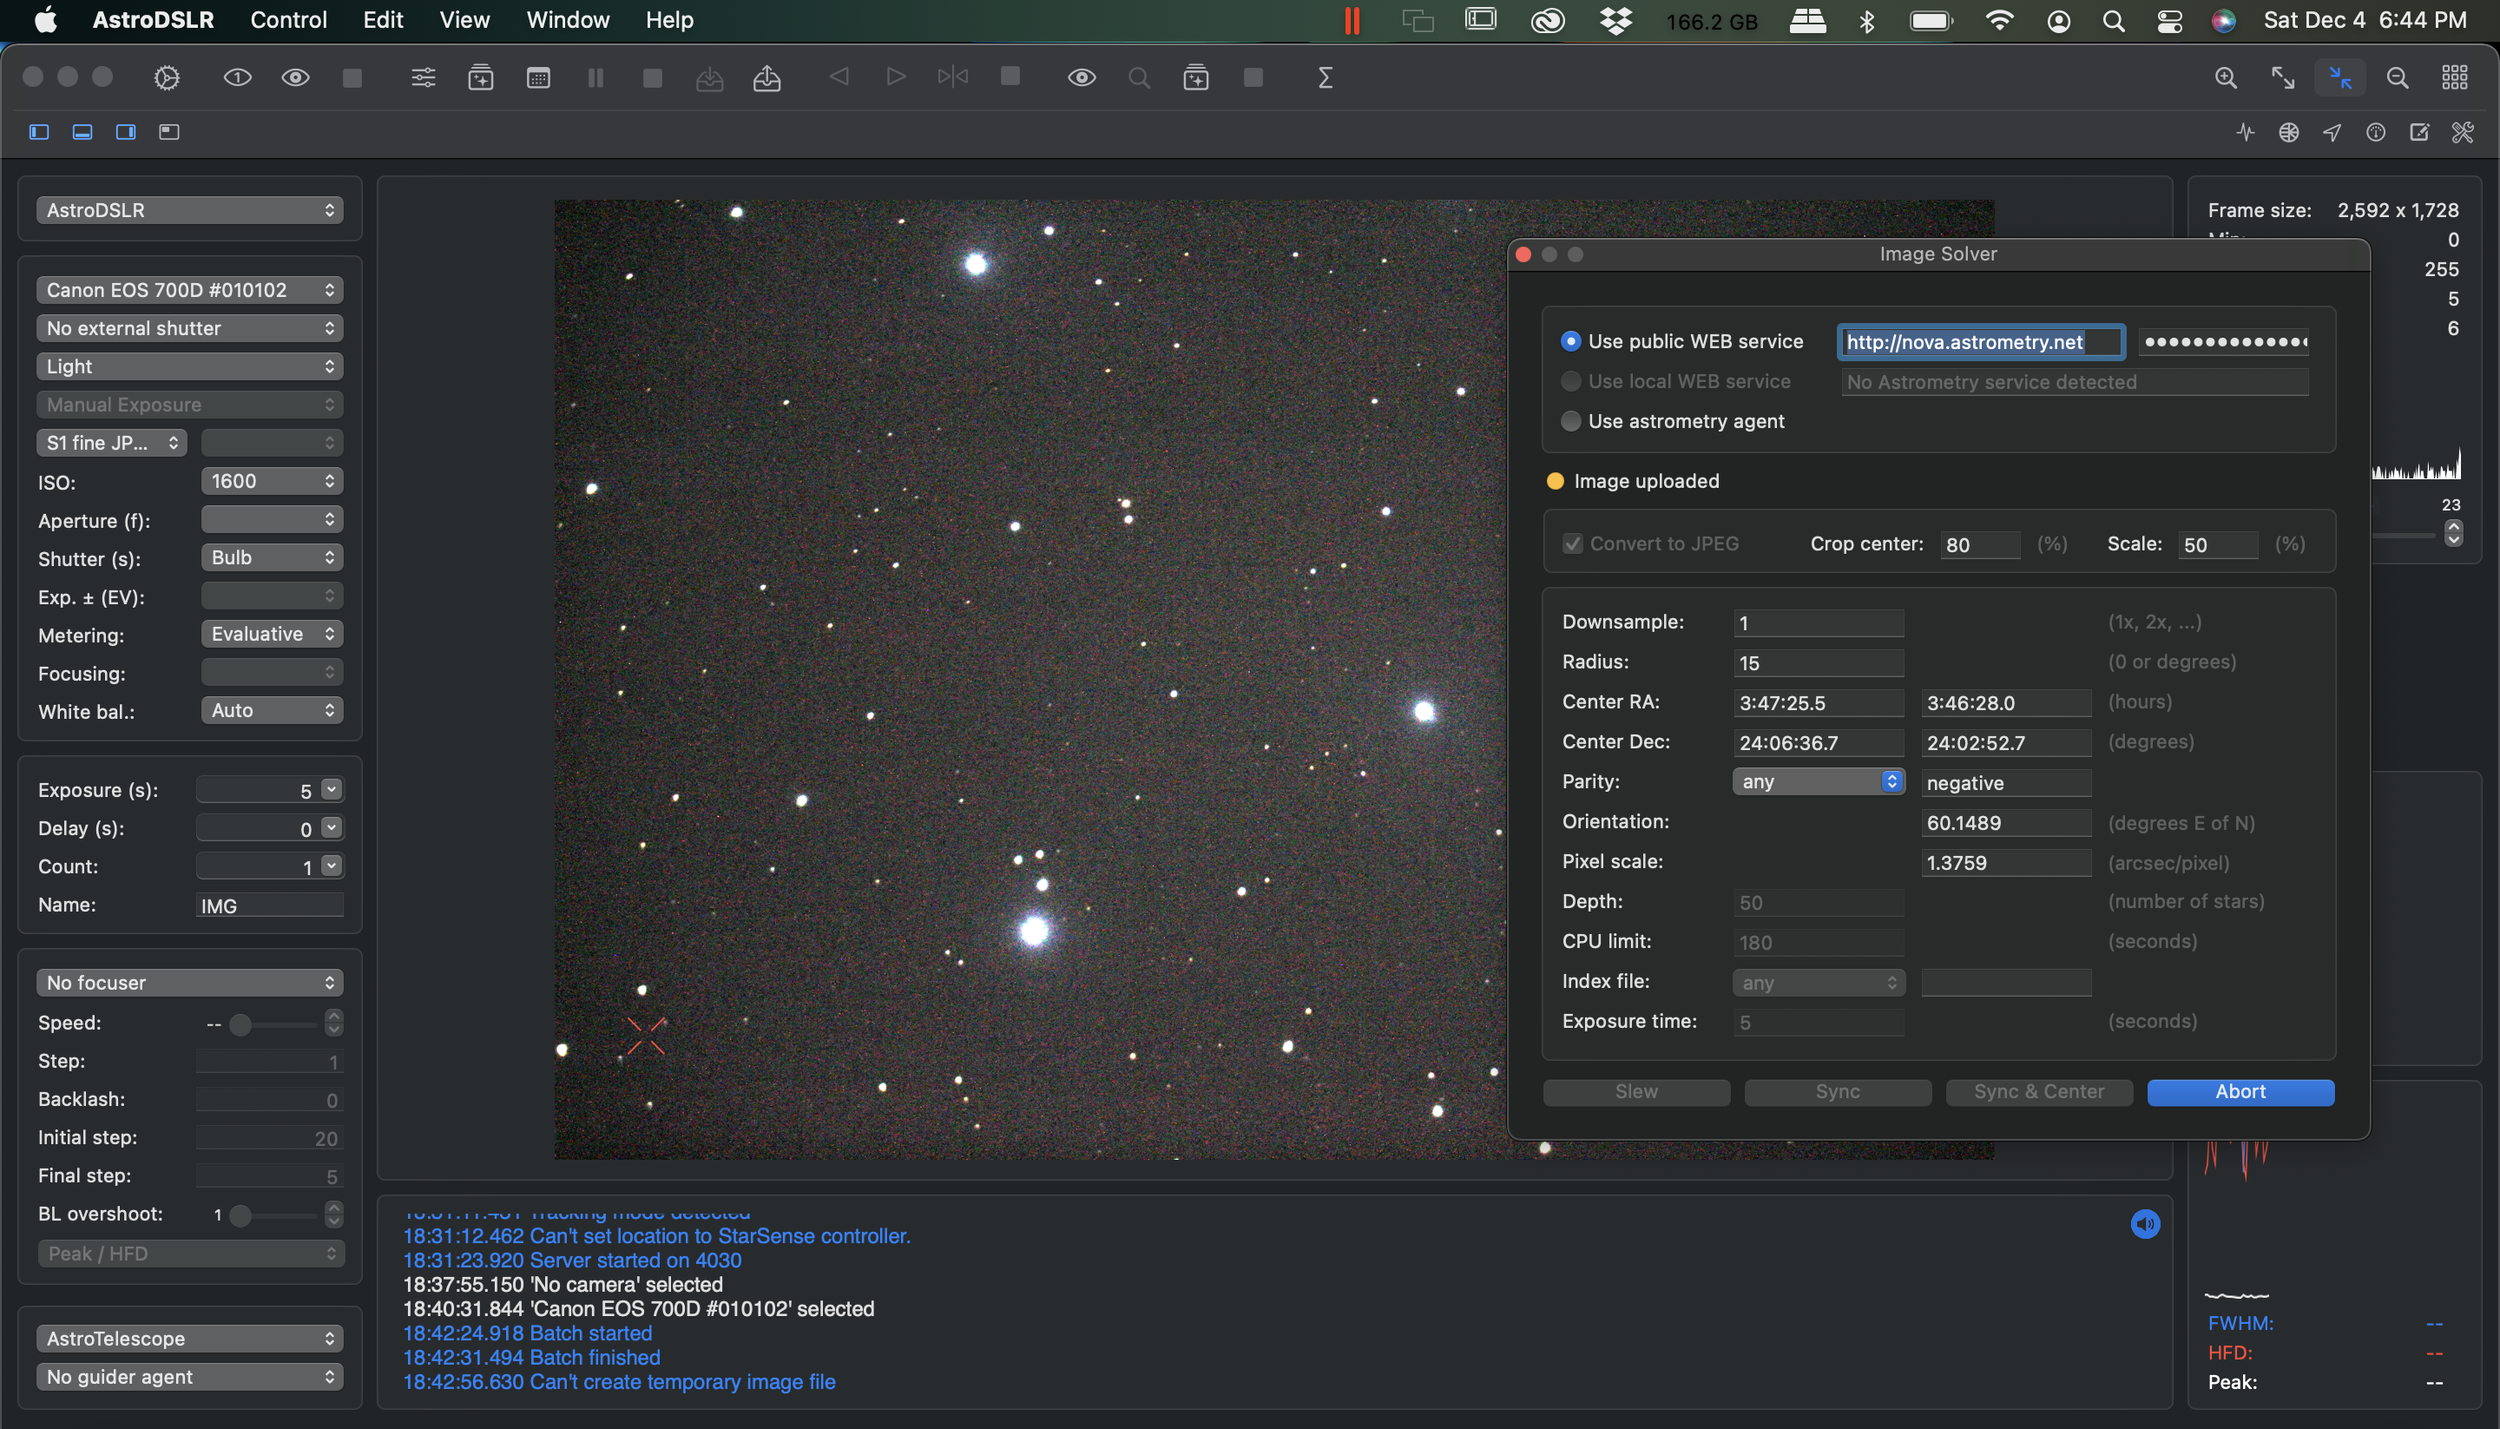
Plate solving with AstroDSLR and AstroTelescope, using a free nova.astrometry.net account. Solving takes about 60 seconds. Afterwards, I press the Sync and Center key and my telescope will slew to the correction.
These are my tools, now a quick primer on how they work. Stacking software aligns your hundreds of photos by matching up stars, then it reinforces the repeating elements and discards the anomalies. When you take your photos, you’ll take up to four sets:
LIGHTS: The normal-exposure photos of the thing you’re photographing. Usually I take at least 25 lights at ISO 1200 - 3200 with exposure times of 5 seconds - 15 seconds
DARKS: Dark photos are taken with the telescope’s lens cap on, so they are black. They need to be taken at the same ISO and exposure time as the Lights and the camera should be at the same temperature as the Lights. I usually take 25 - 50 darks. Your camera produces inherent noise in low-light which will show up in the dark photos. The noise will then be subtracted from the Lights in your stacking software.
BIAS: Bias photos are taken with the telescope’s lens cap on at the same ISO as the Lights but with the fastest exposure your camera has. My T5i can do 1/4000 second. I’ll take 25-50 bias photos. The electronics of your camera produce inherent noise in the sensor, which shows up in the bias photos. This noise is then subtracted from the Lights in the stacking software.
FLATS: You can make flats anytime by putting a diffuse, even, white light source over your telescope and photographing it. Some people use an iPad with a white screen and a t-shirt over it. Your camera’s sensor sensitivity is probably uneven and this will produce stripes or gradients that are noticeable when you boost low-light photographs. These will be subtracted from the Lights in the stacking software.
DARK FLATS: After you take your flats, put the lens cap on to take your dark flats. I was a bit perplexed how these were different than Darks, but Darks at taken at the same temperature and exposure as Lights, while Dark Flats are taken at the same temperature and exposure as Flats.
You feed your lights, darks, bias, and flats into Astro Pixel Processor (or another freeware program like Deep Sky Stacker) and it does the rest. Depending on the number of images you give it, it may take most of the day to process them. The image that you get out of stacking is surprisingly dark, but the image data is there hidden in the pixels. The next step is to make the data visible, a process called stretching. Astro Pixel Processor will do some of this for you, but I prefer Photoshop. During stretching, you adjust the curves of the photo to make the data fall into the visible range. If there are other issues, like the red-green-blue channels being misaligned due to aberrations, you align them to fix the color. It’s interesting that your telescope picked up all this data but it was just too dim to see.
Here’s what the unedited 5-second exposure of the Orion Nebula looked like coming straight from my camera at ISO 3200:
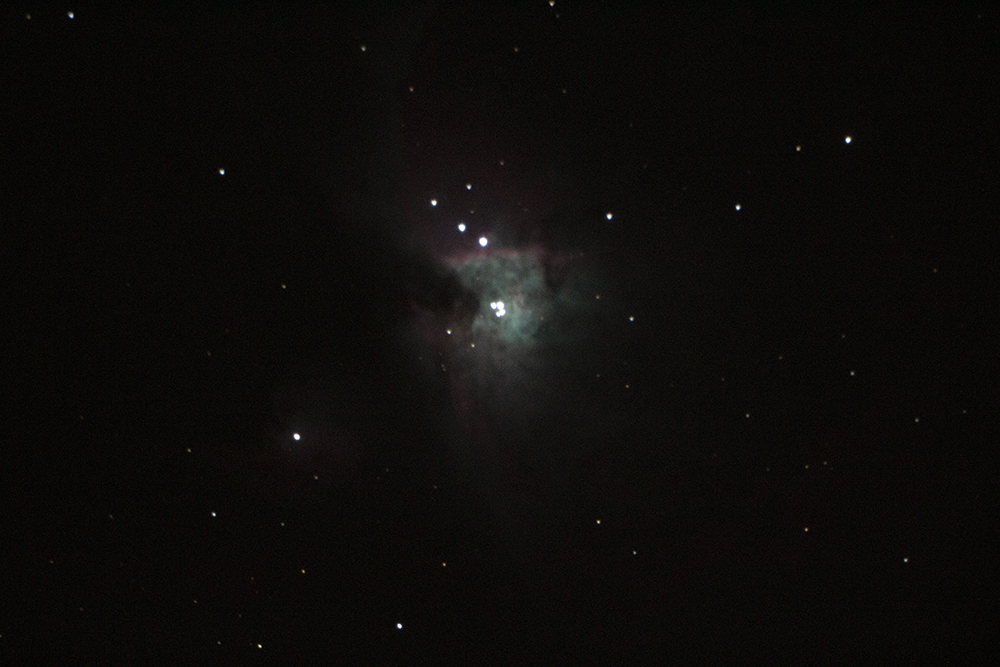
I took that picture 360 times, along with darks and bias photos, and fed it into Astro Pixel Processor. Here’s the Astro Pixel Processor output:

Note the field rotation. The overlapping squares are rotating clockwise. This is because of the alt-az mount.
I then stretched it in Photoshop. Here’s what the final photo looked like:

Just a little different than the original! It’s crazy that all of that was in the top photo to start. I didn’t add anything in Photoshop. I just reset where the white and black points were to straddle the wavelengths of the Orion Nebula. I’m still in awe that I took that from my deck.
Here’s the Orion Nebula taken a few months later with an f/6.3 focal reducer and dual bandpass clip-in UHC filter. Note the difference in colors. (The focal reducer is one of the best additions I’ve purchased and the UHC filter is great for emission nebula like M42):

Fifty 15-second exposures stacked for a total exposure time of 12.5 minutes. There were some tracking issues that caused the elliptical stars, so I’ll be sure to repeat this imaging. This image is inverted versus the first because the original had the star diagonal in place.
Note you should not stack all of the photos you take. You should visually inspect the set before stacking and remove any with blurred stars, clouds, satellite streaks, etc. Had I done that with this photo, I probably could have avoided the elliptical stars.

128 ten second exposures at ISO 3200, taken in January 2022, a year after the previous photo. Despite throwing out the poor tracking shots, the stars still have a pear shape, which was due to the alt-az mount’s tracking capability, the position of Orion in the sky, and field rotation. Note part of the Running Man nebula is visible in the top-left. Due to the 8SE’s error correction, some images would shift down and then back up. During this time, the Running Man nebula was in frame. AstroPixelProcessor stitched it all together.

I now manually review all of my images before stacking them, color coding them red/yellow/green by quality. If I have enough greens, I’ll do the stack with only greens, otherwise I’ll include the yellows.

UHC dual bandpass clip-in filter for my DSLR. It didn’t have much effect for visual astronomy, but for astrophotography it’s great at bringing out the reds in targets if you can manage the extra exposure time. Be sure to take a photo of an even gray surface under noon sunlight with the filter in place so you can set a custom white balance image for the filter’s use. This will correctly remove the blue tint from the filter when you take the picture, instead of trying to color-correct in post.
Note consumer DSLRs like the T5i have a built in IR filter that makes it difficult to photograph dim red emission nebula. You’ll need a dedicated astronomy camera or a willingness to sacrifice your DSLR via surgical extraction if you want to get around it. In my case, I didn’t modify my DSLR.
Hopefully this was helpful. Incidentally, the Cloudy Nights forums are filled with opinions stating that the 8SE is only good for visual astronomy and planetary imaging. I disagree. All of my pictures are taken with the default alt-az mount and a DLSR (and a focal reducer for some), so you definitely can enjoy both visual and astrophotography out-of-the-box. I agree that the 8SE is designed to be a visual astronomy scope, but that doesn’t mean you can’t take some nice astropics with it. A couple of opinions:
Generally, I’ve been successful imaging things in the Messier catalog, although it depends on the color of the target (I don’t have a modded camera and targets with deep reds are harder to photograph than targets with greens). Targets up to 6.5 magnitude can usually be imaged, although I can certainly image fainter magnitudes depending upon the color.
If you envision a time lapse with star trails spinning around Polaris, the ones closest trace small arcs and the furthest large. Same deal when imaging, so the length of an exposure you can take without star trails depends on where an object is in the sky. It’s why there’s no single answer to “how long of an exposure can you take with the Nexstar 8SE?”
There is no reason you can’t piggyback mount a camera to your scope and take wide-field astropics. When you do this, you get all the benefits of the Goto mount and Starsense setup.
Keep in mind that the trade-off for upgrading to a more expensive mount is that you will either need a helper to set up your scope or you’ll need extra time to carry it out piecemeal and assembly it. It’s definitely a plus that I can carry the entire assembled scope onto the deck by myself. The typical EQ mounts people direct 8SE owners to on the forum weigh in at 76 pounds, excluding the telescope and accessories, so your total kit weight will exceed 100 pounds with these.
I may upgrade to an EQ mount for longer exposures, or I may get a lightweight camera-only EQ setup, such as a Star Adventurer. I’m leaning towards the Celestron AVX, since weight is important to me. I realize guiding will be trickier with the AVX than a higher-payload scope such as the CGEM, but I just don’t think I’ll use my scope as often if I need to assemble it each time.
You can use light pollution or ultra-high contrast filters, but these further eat into your exposure time because they block not only the bad light but also a little of the good light, so these work best with brighter objects such as the Orion Nebula and/or a focal reducer (although if the target’s color is right, such as the Dumbell Nebula, these have helped me with faint objects).
Here’s a few other (less dramatic) photos I’ve taken in the months leading up to the Orion pic. These all have much less exposure time but were fun none-the-less:

M13 Hercules Cluster - a great visual eyepiece target as well - it’s a very bright cotton ball to the eye

M27 Dumbell Nebula - hard to see through the eyepiece, but colorful in a long exposure. The super-colorful photos you’ll find on the internet are done with special narrowband filters

Same image of M27 taken a year later with a focal reducer and UHC filter. Much easier to see through the eyepiece with a focal reducer. Two things to note versus the previous image: 1) The focal reducer changes the telescope’s f-stop from f/10 to f/6.3. You can see dimmer parts of the nebula’s sides visible in this image that were lost in the first. 2) The UHC filter, which is blue, makes reds more visible. The reds at the top and bottom of the nebula are stronger and more saturated here. Also, individual stars are red. Note this is a magnitude 7.5 object, still easily photographed both with and without a focal reducer using the 8SE.

M57 - the Ring Nebula - small even with my Nexstar’s huge 2032 mm focal length. What’s awesome about the Ring Nebula is that it looks exactly like this visually through the telescope eyepiece. M57’s magnitude is 8.8 - again, easily photographed without a focal reducer and readily visible through the eyepiece.

This one needs no introduction! It was a bit late in the summer before I figured out how to get good planetary photographs and Saturn was already past its peak. Next summer I should get a clearer image. Not too bad, though. Planets are so bright that the best way to photograph them is to take a video and feed the video into the stacking software. The video will contain thousands of frames to stack. Keep in mind that with video your exposure is limited to your frame rate, so if your video captures at 30 frames per second then your exposure is 1/30 of a second. Generally you’ll only be able to capture the Moon or planets at 1/30th of a second.

Saturn taken the following summer. I had better optics, since I’d upgraded everything to 2” Luminos, including the Barlowe in use here, but was still using a Canon T5i DSLR. I may need a different imager if I want to get a less pixelated image for something this size.

NGC2301 Hagrid’s Dragon, taken with a f/6.3 focal reducer on the Nexstar 8SE. A good visual target as well because it looks similar to this and you can make out the yellow and blue star colors easily by eye. This photo is yet another plug for owning a focal reducer - the clarity of the stars is greatly improved compared to my non-focal reducer photos.

M81 Bode’s Galaxy taken with a f/6.3 focal reducer. Galaxies are not one of the strong points of the Nexstar 8SE when shooting with an alt-az mount, mainly because your exposures will be 10-15 seconds and you need more signal for the faint structures of galaxies. Bodes is one of the brighter galaxies and photographs well, however.

The Moon taken with a f/6.3 focal reducer. I included this so you can compare it to the earlier daytime moon photo that was stitched together with six pictures. This nighttime photo is a single picture, so you can fit the entire moon in frame with the focal reducer. This is still too much magnification to photograph the Andromeda galaxy, however (which is 6 full moons wide). Note the slight reddish tint in the upper left of the Moon. The Moon’s colors normally are lost to our eye, washed out by sunlight, but you can see a hint of them here.

M17 The Swan Nebula taken with a f/6.3 focal reducer and UHC filter. Through the eyepiece, this nebula appears like a milky cone.

M8 The Lagoon Nebula taken with a f/6.3 focal reducer and a UHC filter. M8 is a great summer visual target where I live.
While you’re here, if you enjoy sci-fi stories with a classic exploration theme, why not check out my series, Hayden’s World, available on Amazon and Audible?